Home / Beginner’s School / How to Steam Milk
Beginner’s School · Milk & Texture
How to Steam Milk: Complete Barista Guide 2026
The exact wand position, timing, and temperatures that turn cold milk into glossy, pourable microfoam — for dairy, oat, soy, and almond.
·
Last updated: August 21, 2026
·
10 min read
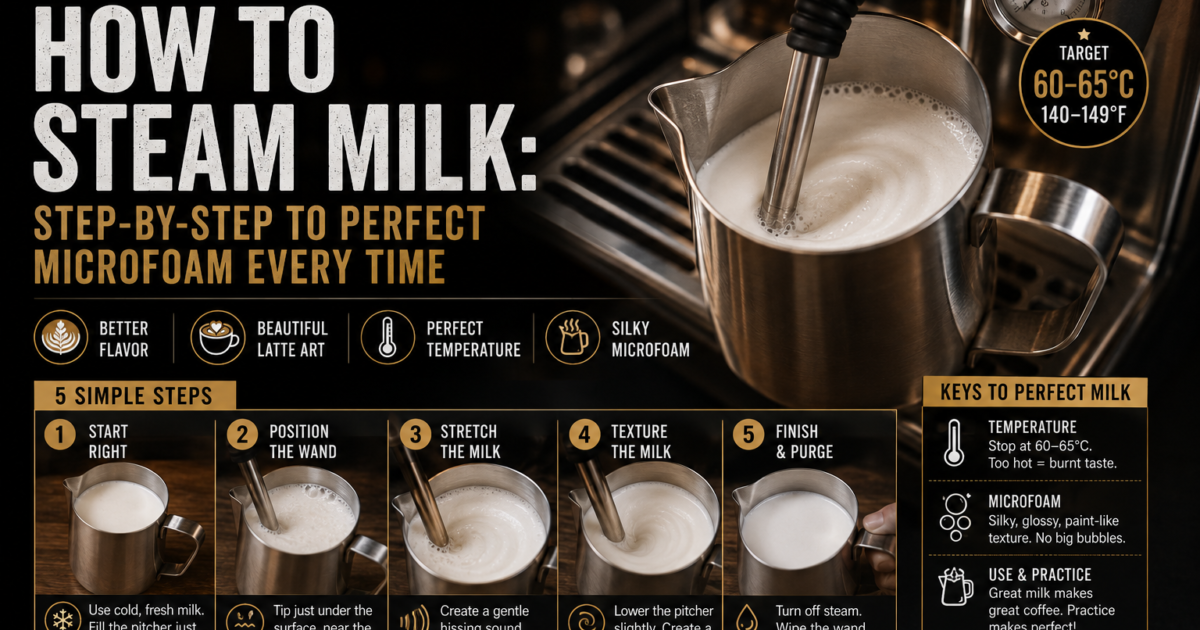
Quick AnswerTo steam milk, submerge the steam wand tip just below the surface at an angle and let it pull in air for two to four seconds until the milk roughly doubles in volume — this is the “stretch.” Then push the tip slightly deeper to spin the milk into a tight whirlpool — the “texture” — until it reaches 150–155°F (65–68°C). Shut off the steam, tap out any large bubbles, swirl until glossy, and pour right away.
Steaming milk is the single skill that separates a flat, grocery-store latte from one that looks and tastes like it came from a good café bar. It isn’t about a fancy machine — it’s about wand position, timing, and reading the milk with your hands. This guide covers the full technique for how to steam milk like a barista, plus the exact temperatures and adjustments for whole, oat, soy, and almond milk.
What you need
- An espresso machine with a steam wand. Single-hole tips give the most control; multi-hole and panarello sleeves are more forgiving while you’re learning.
- A stainless steel milk pitcher. 12oz (350ml) for one drink, 20oz (600ml) for two.
- Cold milk, straight from the fridge (around 38–40°F / 3–4°C). Colder milk gives you more working time before it hits temperature.
- A thermometer (optional, but useful while you’re building the skill).
- A clean, damp cloth to purge and wipe the wand after every use.
What “steaming milk” actually means
Two separate things happen during a good steam, and mixing up the order is the most common beginner mistake:
- Stretching (aeration): introducing air into the milk to build volume. This is what creates foam in the first place.
- Texturizing (the whirlpool): spinning the milk in a tight vortex so it breaks large bubbles into microfoam — without adding any more air.
- Microfoam is the goal: fine, glossy, paint-like milk where you can’t see individual bubbles. It’s the opposite of the dry, cotton-ball foam that sat on top of 1990s cappuccinos.
Step-by-step: how to steam milk
-
Purge the wand
Open the steam valve for a one- to two-second blast before it touches the milk. This clears out condensed water so you don’t dilute the pitcher.
-
Position the pitcher
Fill to the bottom of the spout — about a third full. Tilt the pitcher slightly and submerge the tip just below the surface, off to one side, so the milk has room to spin rather than sitting dead center.
-
Stretch the milk
Turn the steam on fully. Hold the tip near the surface for two to four seconds. Listen for a soft, even “tss-tss” — like tearing paper, not sputtering. Volume should roughly double.
-
Submerge and texture
Push the tip about a centimeter deeper so the milk spins in a tight whirlpool without pulling in more air. Keep it there until the pitcher starts to feel warm.
-
Watch the temperature
Target 150–155°F (65–68°C) for whole dairy milk. By touch: when the pitcher gets uncomfortable to hold bare-handed, you’re close.
-
Turn off a few degrees early
Steam continues heating the milk for a couple of seconds after you shut it off, so cut the power just before you hit your target.
-
Tap and swirl
Tap the pitcher firmly on the counter to collapse any large bubbles, then swirl in tight circles until the surface looks glossy, like wet paint.
-
Pour immediately
Milk and foam start separating within 30–60 seconds. Pour right away for the best texture and the cleanest latte art.
whirlpool spins toward the edge
Dial in the exact target for your milk with our Milk Steaming Temperature Calculator. A visual Milk Steaming Simulator — matching wand angle and timing to live temperature feedback — is in development.
Milk steaming temperature chart
Every milk behaves differently under heat. Dairy is forgiving; alternative milks are far more particular about both temperature and using a proper barista-blend version.
| Milk type | Target temp | Notes |
|---|---|---|
| Whole / dairy | 150–155°F | The benchmark. Sweetest around this range — higher scalds the lactose. |
| 2% / skim | 155–160°F | Less fat means less natural sweetness and a less stable foam. |
| Oat (barista blend) | 140–150°F | Too hot and the starches break down, turning gritty. |
| Soy (barista blend) | 140–150°F | Most heat-sensitive — above ~160°F (71°C) it can curdle. |
| Almond (barista blend) | 135–145°F | Low protein gives thin foam — go gentler, pour sooner. |
| Coconut (barista blend) | 140–150°F | Foams well but loses structure fast — pour without delay. |
“Barista blend” alt milks are formulated with added protein or oil for steaming. Regular alt milk from the fridge usually won’t foam properly and is far more prone to splitting.
Steaming different milk types
How to steam oat milk
Barista-blend oat milk comes closest to dairy in texture. Because oat foams up quickly, cut the stretch phase a beat shorter than you would for dairy, and keep the temperature at or below 150°F (65°C) — overheated oat starch turns the drink slightly gritty and dulls the natural sweetness.
How to steam soy milk
Soy is the most heat- and acid-sensitive milk on this list. Always use a barista-blend soy — regular soy milk is prone to curdling when combined with the acidity of espresso. Keep the temperature under 150°F (65°C), and pour promptly, since soy foam collapses faster than dairy.
How to steam almond milk
Almond milk is naturally low in protein, so even barista blends produce a thinner, less stable foam. Use a shorter stretch phase and a slightly lower target temperature (135–145°F / 57–63°C), and pour within seconds of finishing — almond foam separates quickly.
How to steam whole milk
The reference point for everything above. Higher fat content stabilizes the foam, and the natural sugars caramelize just enough in the 150–155°F (65–68°C) range to taste noticeably sweeter than either colder or hotter milk.
Common mistakes and how to fix them
How to practice steaming milk
- Practice with water + a drop of dish soap instead of milk. It mimics milk’s surface tension for drilling wand position and the whirlpool motion without wasting anything.
- Count the stretch out loud (“one-Mississippi, two-Mississippi”) until the timing becomes automatic.
- Wean off the thermometer — note the temperature each time you set the pitcher down, and start predicting it by touch before you look.
- Film your wand angle from the side occasionally to self-check position.
- Steam small batches (about 6oz / 180ml) so an off pour costs less milk while you’re building consistency.
- Set a weekly rep goal. Most people need well over 100 pours before the technique feels consistent on demand.
From steamed milk to latte art
Microfoam texture — not the pour itself — does most of the work in latte art. Milk that’s too airy or too thin won’t hold a heart, tulip, or rosetta no matter how precise the pour. Once your steaming is consistent, the pour patterns come much faster. See our full Latte Art Guide for pouring technique once your microfoam is dialed in.
Your machine and wand type
Wand design changes how forgiving the process is:
- Single-hole tips (common on machines like the La Marzocco Linea Micra) give the most control over the whirlpool, with a steeper learning curve.
- Multi-hole tips steam faster and are more forgiving of imperfect positioning.
- Panarello / frother sleeves (found on many entry-level machines like the Breville Barista Express) auto-aerate, which is easier for beginners but offers less microfoam control.
Boiler type matters too: dual-boiler and heat-exchanger machines can steam and brew at the same time with strong, stable pressure, while single-boiler thermoblock machines often need a short pause between shot and steam. Compare options in our Best Espresso Machines guide, and wipe and purge the wand after every use — see our full Espresso Machine Maintenance guide for the full care schedule.
Frequently asked questions
What temperature should steamed milk be?
For whole dairy milk, the standard barista target is 150–155°F (65–68°C). Above roughly 160°F (71°C), milk proteins denature and the lactose starts to taste scalded rather than sweet.
How long does it take to steam milk?
Roughly 15–30 seconds for a single drink’s worth of milk (about 6–8oz / 180–240ml), depending on your machine’s steam pressure and starting volume.
Why is my milk not foaming?
The wand tip is likely staying too deep in the milk the whole time, so no air is being introduced. Start closer to the surface during the first few seconds before submerging deeper to texture.
Can you steam milk without a steam wand?
Yes — a handheld frother, a French press pump method, or an electric milk frother can all add air and heat, but none reproduce the fine, glossy microfoam a proper steam wand and whirlpool create.
How do I steam oat milk without it going flat?
Use a barista-blend oat milk, keep the stretch phase a beat shorter than dairy, and stay at or below 150°F (65°C) so the oat starches don’t break down and turn gritty.
Why does my soy milk curdle when steaming?
Curdling usually comes from using a non-barista soy milk, overheating past about 150°F (65°C), or both. Barista-blend soy holds up to heat and espresso’s acidity much better than regular soy milk.
What’s the difference between frothing and steaming milk?
Frothing generally means adding air to create a drier, bigger-bubbled foam sitting on top of a drink. Steaming for espresso combines stretching and texturizing so the milk becomes fine, glossy microfoam that integrates into the drink.
How full should I fill the pitcher before steaming?
Fill to the bottom of the spout — roughly a third full. Milk approximately doubles in volume during steaming, so this leaves enough headroom to avoid overflow.
Do I need a thermometer to steam milk?
Not long-term, but it helps while learning. Most experienced baristas judge temperature by touch: when the pitcher becomes uncomfortably hot to hold bare-handed, the milk is ready.
How often should I clean the steam wand?
Wipe and purge it after every single use — leftover milk burns onto the tip and clogs the holes. Follow your machine’s schedule for a deeper soak or backflush.
Related guides
Some links on this site are affiliate links. We may earn a small commission at no extra cost to you.